For those who have not read my original blog post about how to turn VHDL into block diagrams using netlistsvg, it is a really useful program that takes a netlist from, for example, Yosys, and is able to turn it into a really useful block diagram.
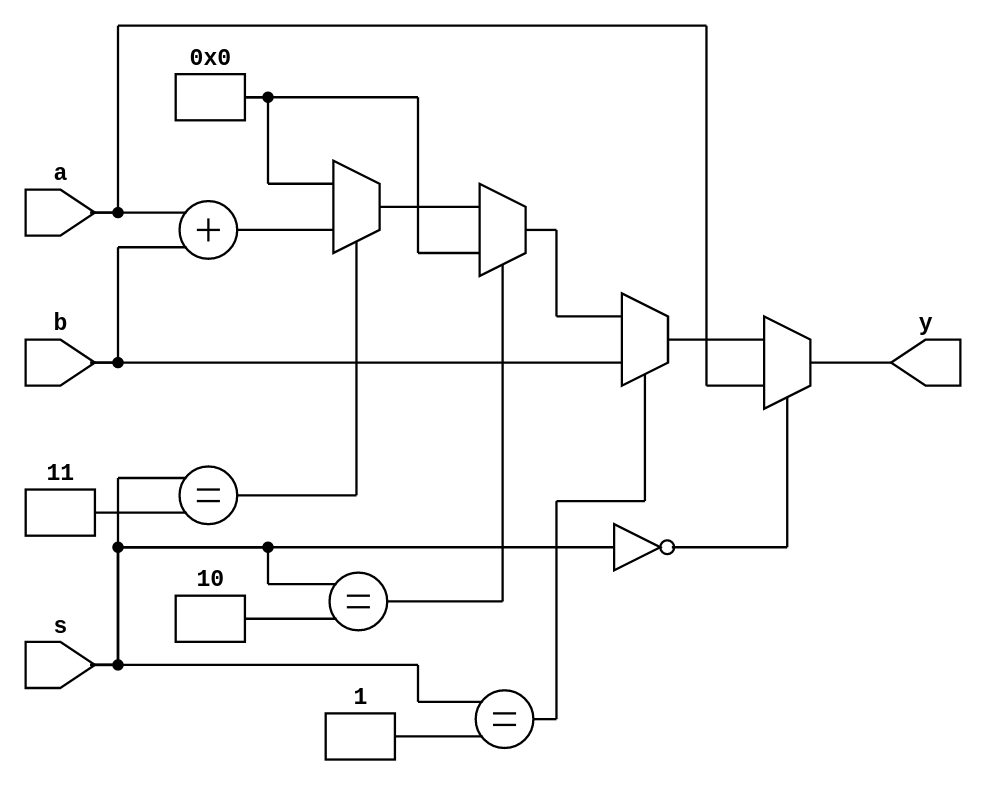
For example, the following VHDL would generate this block diagram:
library IEEE;
use IEEE.std_logic_1164.all;
use IEEE.numeric_std.all;

entity top is
    port(
        a :  in unsigned(3 downto 0);
        b :  in unsigned(3 downto 0);
        s :  in unsigned(1 downto 0);
        y : out unsigned(3 downto 0)
    );
end top;

architecture rtl of top is

begin

    y <= (     a) when (s="00") else
         (     b) when (s="01") else
         ("0000") when (s="10") else
         ( a + b) when (s="11") else (others => '0');

end;
While this image looks really good, I thought it could be better. There have been a few issues on GitHub that have been open for a while, and I decided to try tackling them. These issues were Indicate bus width #26, and INOUT Port direction throws error #82, the latter being the reason for sed workarounds in my previous blog post. I also wanted to tackle modifying the icons a little, specifically adding a multibit version of the mux.
Over the past few weeks, I’ve dived into the source code, figuring out how it works, and making small improvements. As it’s written in Typescript, and I’ve never used Typescript before, this was an interesting and insightful experience.
development setup
At first, I had (improperly) thought that the two folders lib/ and built/ in the root of the netlistsvg project were two independent copies of the same code that were just being updated together, but this was wrong. lib/ contains the Typescript source code, while built/ contains the compiled Javascript from the Typescript source. This is important as any changes you make in built/ will be overwritten every time the Typescript is compiled.
To pull the program apart and figure out how it worked, I started by modifying the compiled Javascript in built/. After uninstalling netlistsvg using npm uninstall netlistsvg -g, I could run npm link and have the changes I made be immediately effective, versus having to recompile and install every time. This way as well, I could use console.log() to print out the values of the objects I was working with to truly understand what was happening to them.
The development process was then to go back and forth between making modifications in built/ and checking the output for a few test images, to then after I had gotten something working well, reimplementing it in Typescript in lib/. I then could recompile the Javascript by running npm run test-examples, which would lint / compile the Typescript, and test it to make sure it worked correctly with a few examples.
“inout” and “z”
Tackling #82 was simple after I figured out how schema validation works for when importing a netlist. There’s a validation check json at lib/yosys.schema.json5 to make sure the netlist isn’t going to cause further problems down the line, and adding "z" and "inout" to this fixed the issue. Changing this, "z" is treated as "x", and "inout" is treated as an "output". As I was working on this, I also added an icon for a tribuffer, as the default skin was missing one.
indicating bus width
The first part of figuring out #26 was to determine where the width of edges is set (edges being the lines that connect cells, and cells being the individual blocks). This is set in lib/drawModule.ts, which takes the modified and layed out netlist after it’s sent through ELKjs, and draws the actual svg cells to the canvas. Simply put, I checked the netId (a unique ID for each edge that has a list of all the wires it contains) to see if it contained multiple wires. If it did, I would change the resulting svg block style, doubling the line thickness.
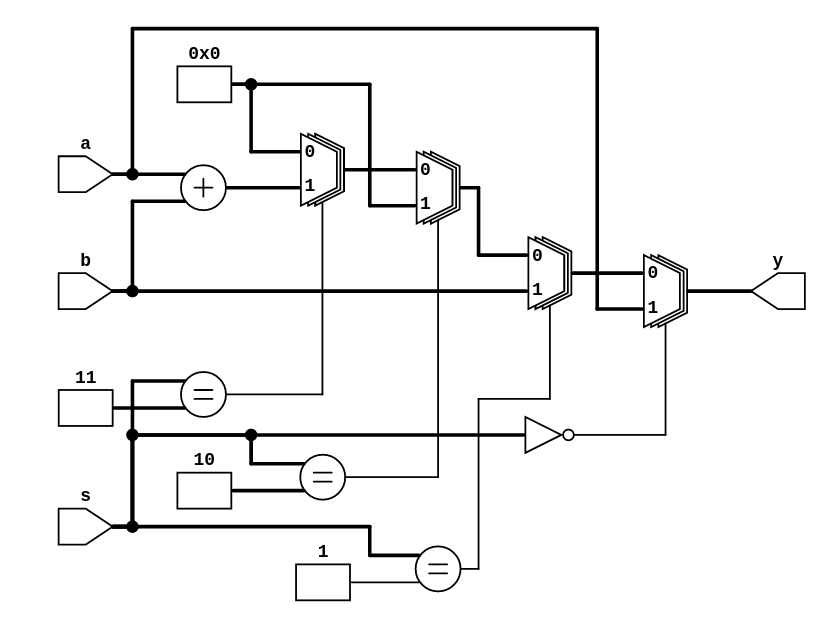
With all the changes so far, the output of the example above looked something like this:
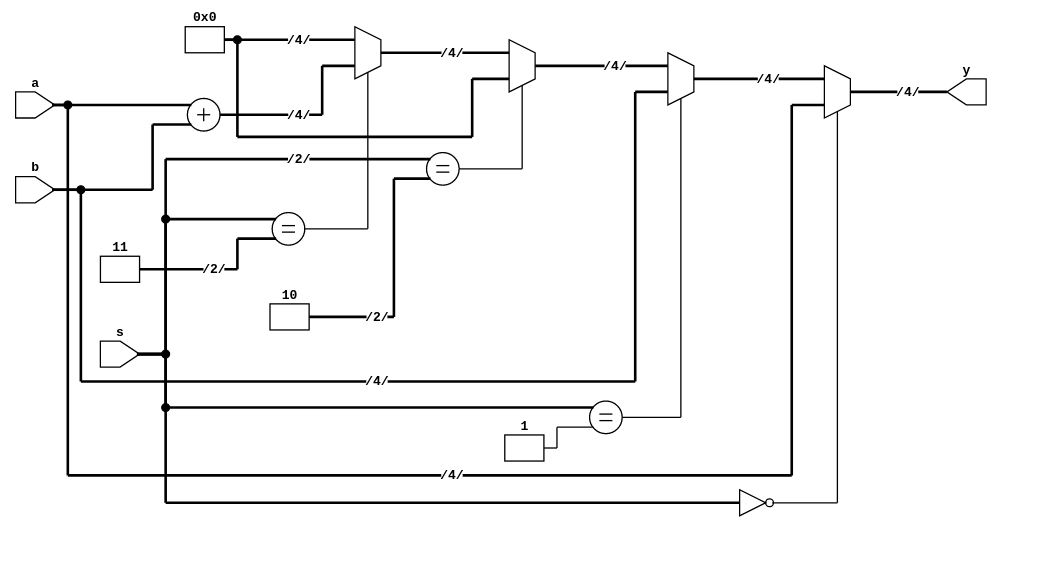
The second part of figuring out #26 was actual labels on buses indicating the width. ELKjs actually has built-in the ability to layout edge labels, and after adding them to the layout in lib/elkGraph.ts, the layout seemed to change to make space for them, but they didn’t show up. This took me a bit to figure out, but it was as simple as them not being drawn in lib/drawModule.ts. After I figured out how to draw them, and finagled with it to get it looking right with all of the labels in-line, it worked. The only problem was the edge the label was for went through the label itself, and so I added a white box to the background to make sure the text was legible.
Those changes looked something like this:
I had to split up the solutions to each of #26 and #82 to make it easier when creating the pull request for merging it upstream, hence why there aren’t multibit muxes in the image above.
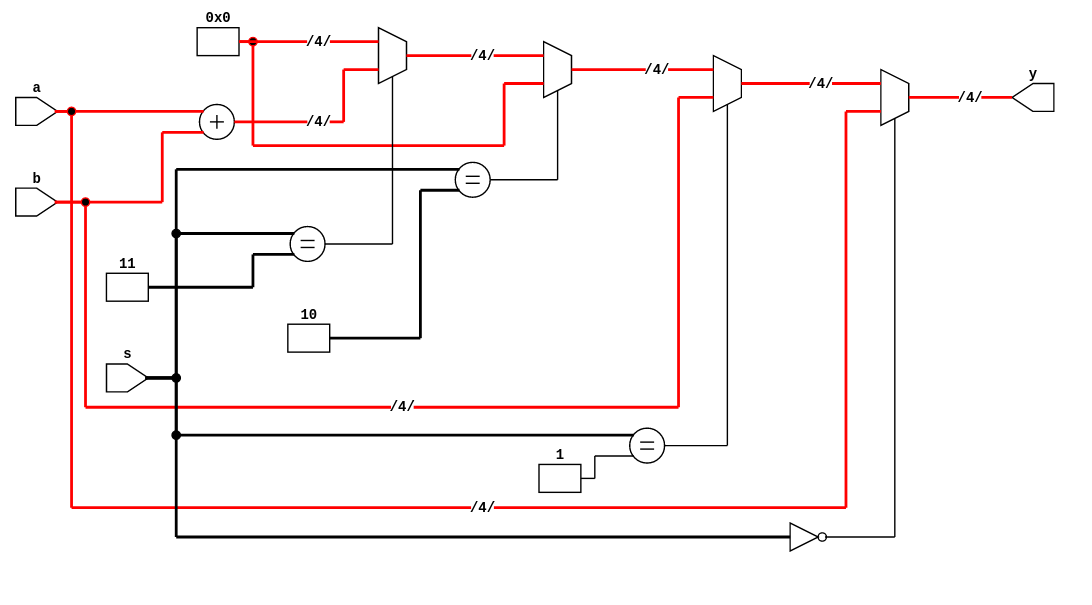
In addition, I added classes busLabel_* and width_* to the edges and labels respectively so that custom CSS could be added to the skin file for additional modifications. For example, adding this to the <style> tag at the top of the skin file hides the labels for width 2 and changes the edge color to red for width 4.
.busLabel_2 {
    fill-opacity: 0;
}
line.width_4 {
    stroke: red;
}
multibit variations of cells
Yosys outputs the width of certain cells via parameters in the netlist. At first, I had implemented a check for $mux and its variants that if it had a WIDTH parameter greater than 1, then it would change the cell type to multimux. This wasn’t ideal, as it required modifying the source code if multibit variants of other cell types were wanted, as well if the aliases of $mux changed.
Instead, I implemented a check for if a cell had a WIDTH parameter, simply append -bus to the end of the type. Then I could simply add aliases to the skin file for those that I’d expect to have a WIDTH parameter. That way, any cell with a WIDTH parameter would be able to have multibit variants. So far though, there are only multibit variants for $mux. I also specifically didn’t add -bus to those cells that also had an ADDR parameter so it didn’t apply to the $mem cells, as it didn’t make sense to have multibit variants of them.
For posterity, here are the current cell types that have a WIDTH parameter, not including other aliases of these types, based on Yosys documentation found here:
$mux,$pmux$tribuf$sr$dff$dlatch$mem,$memrd,$memwr,$meminit
minor tweaks
After all this, I went and made minor tweaks to all of the icons, making sure they looked good with double thickness lines, adding 0’s and 1’s to the muxes, and rounding the ends of edges so that corners looked smooth instead of jagged.
After all the modifications, netlistsvg now generates this:

turning VHDL into a block diagram
The new process for taking VHDL and turning it into block diagrams is now even simpler. With the open source fpga toolchain installed, simply do:
TOP=top
ghdl -a --std=08 ${TOP}.vhdl
yosys -p "ghdl --std=08 ${TOP}; prep -top ${TOP}; write_json -compat-int svg.json"
netlistsvg svg.json -o ${TOP}.svg
No sed required.
Overall this was a really fun experience, and I hope to keep working on improvements to netlistsvg in the future. Special thanks to nturley for all the awesome work they’ve put into netlistsvg, without none of this would’ve been possible. The source code for netlistsvg is available at it’s GitHub repo here, incorporating all my changes mentioned above.